Decorative transfers have revolutionized DIY home décor, allowing enthusiasts to add intricate designs to furniture, walls, and accessories without the need for painting skills or stencils. Whether you’re a seasoned crafter or a beginner, understanding what is a decorative transfer can open up a world of creative possibilities. These artistic embellishments help transform ordinary surfaces into stunning masterpieces with minimal effort.
This in-depth guide will cover everything you need to know about decorative transfers, including their definition, types, application process, benefits, and expert tips to ensure professional-looking results.
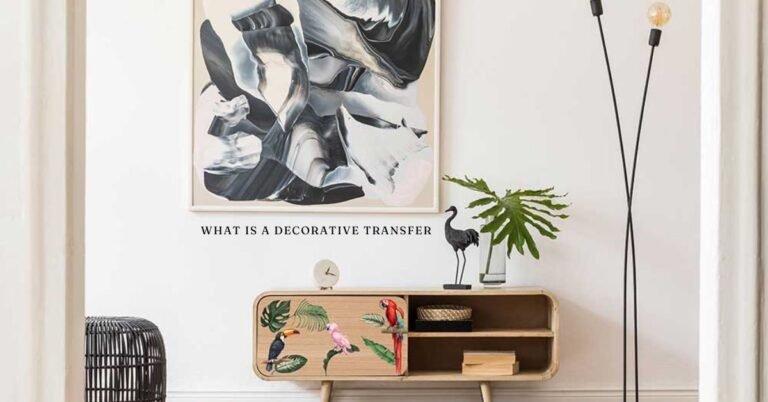
Understanding Decorative Transfers: What Are They?
A decorative transfer is a pre-designed decal or image that adheres to various surfaces, including wood, glass, metal, and fabric. Unlike stickers or vinyl decals, decorative transfers do not have a visible film or border once applied, making them look seamlessly painted or printed onto the surface. They work through a rub-on or heat-transfer method, allowing for a smooth and professional finish.
These transfers are commonly used for furniture refinishing, wall art, and creative craft projects. Popular among DIY enthusiasts, they provide an easy and cost-effective way to enhance any home décor without requiring advanced artistic skills.
Key Features of Decorative Transfers
- Intricate Designs: Offers professional-quality images that mimic hand-painted artwork.
- Seamless Application: No visible edges or glossy finishes, blending perfectly into the surface.
- Versatile Usage: Can be applied to furniture, walls, ceramics, and more.
- Durability: When sealed properly, they last for years without peeling or fading.
- Easy Application: Requires only a burnishing tool, making it accessible for beginners.
Types of Decorative Transfers: Finding the Right Style for Your Project
There are several types of decorative transfers, each suited for different materials and aesthetics. Knowing the options available will help you choose the best one for your project.
1. Rub-On Transfers
Rub-on transfers are the most common type, applied using a transfer tool or a wooden stick. They adhere to surfaces through friction, creating a smooth and seamless look. These are ideal for wooden furniture, glass, and canvas.
Best Used For:
- Furniture makeovers (dressers, cabinets, tables)
- Home décor projects (vases, mirrors)
- Scrapbooking and paper crafts
2. Heat Transfers
Heat transfers require an iron or heat press to bond the design onto the surface. They are commonly used for fabric applications, such as customizing T-shirts, pillowcases, and tote bags.
Best Used For:
- DIY apparel and fabric projects
- Personalized home textiles
- Wood and leather embellishments
3. Water Slide Transfers
Water slide transfers involve soaking the design in water before sliding it onto a surface. These transfers work well on ceramics, glassware, and polymer clay.
Best Used For:
- Custom mugs and plates
- Decorative glass bottles
- Handmade crafts and jewelry
4. Vinyl Transfers
Although technically not traditional decorative transfers, vinyl transfers use adhesive-backed designs to decorate surfaces. They are commonly used for wall decals and signage.
Best Used For:
- Wall art and lettering
- Car decals and window decorations
- Custom nameplates and labels
How to Apply Decorative Transfers: Step-by-Step Guide
Applying a decorative transfer is a straightforward process, but following the correct steps ensures a flawless finish. Below is a detailed guide for a successful application.
Materials Needed
- Decorative transfer sheet
- Transfer tool (burnishing stick, scraper, or credit card)
- Clean, dry surface
- Painter’s tape (optional)
- Clear sealant (for durability)
Step 1: Prepare the Surface
Ensure that the surface is clean, dry, and free of dust or grease. For wood projects, a smooth, lightly sanded surface works best.
Step 2: Position the Transfer
Cut out the desired transfer design and place it on the surface. Secure it with painter’s tape if needed to prevent shifting.
Step 3: Apply the Transfer
Using a burnishing tool or scraper, firmly rub over the design to transfer it onto the surface. Apply even pressure, especially around edges and fine details.
Step 4: Peel Off the Backing
Carefully lift the backing paper, ensuring that the entire design adheres to the surface. If any areas remain untransferred, lay the sheet back down and rub again.
Step 5: Seal the Transfer
For long-lasting results, apply a clear sealant over the transfer, such as polycrylic or wax, to protect it from scratches and moisture.
Benefits of Using Decorative Transfers in Home Décor
Decorative transfers offer numerous advantages, making them a popular choice for DIY and professional decorators alike. Here’s why they’re an excellent addition to any project.
1. Enhances Aesthetic Appeal
Decorative transfers instantly elevate the look of furniture, walls, and accessories, adding a sophisticated and artistic touch.
2. Cost-Effective Home Makeovers
Instead of purchasing new furniture or expensive artwork, transfers allow for budget-friendly transformations.
3. No Artistic Skills Required
Unlike painting or stenciling, decorative transfers do not require artistic ability, making them accessible to beginners.
4. Versatile and Customizable
With a wide range of designs available, decorative transfers suit various interior styles, from vintage and shabby chic to modern and minimalist.
5. Quick and Easy Application
Compared to hand-painting, transfers save time while achieving professional results.
Common Mistakes to Avoid When Using Decorative Transfers
Even though decorative transfers are easy to use, common mistakes can lead to poor results. Here are some pitfalls to avoid.
1. Applying on Uneven or Dirty Surfaces
Dust, grease, and rough textures prevent proper adhesion. Always clean and prep the surface beforehand.
2. Rushing the Application Process
Applying too quickly can lead to wrinkles, bubbles, or incomplete transfers. Take your time and work carefully.
3. Skipping the Sealing Step
Without a protective sealant, the transfer may fade or peel over time. Always seal your design for durability.
4. Using Excessive Force
While pressure is needed to transfer the design, pressing too hard may tear the transfer sheet or distort the image.
Comparison Chart: Decorative Transfers vs. Other DIY Techniques
| Feature | Decorative Transfers | Stencils & Painting | Vinyl Decals |
|---|---|---|---|
| Ease of Use | Very easy | Requires skill | Moderate |
| Durability | High (with sealant) | High (if sealed) | Moderate |
| Cost | Affordable | Can be costly | Moderate |
| Variety of Designs | Extensive | Limited to skill | Moderate |
| Time Required | Quick application | Time-consuming | Moderate |
Conclusion: Why Decorative Transfers Are a Must-Try for DIY Enthusiasts
Now that you know what is a decorative transfer, you can confidently incorporate them into your DIY projects. These innovative embellishments provide an effortless way to enhance furniture, walls, and accessories without needing artistic expertise. Whether you’re looking to refresh old furniture, personalize home décor, or create unique crafts, decorative transfers offer a perfect blend of beauty, ease, and affordability.
By following the right techniques and avoiding common mistakes, you can achieve professional-quality results that make a lasting impact. Try decorative transfers today and transform your space with creativity and style!
FAQs About Decorative Transfers
1. Are decorative transfers permanent?
Decorative transfers are semi-permanent and can last for years when sealed properly. However, they can be removed with sanding or special solutions.
2. Can decorative transfers be used outdoors?
Yes, but they require a durable topcoat to withstand weather exposure.
3. Are they reusable?
No, decorative transfers are designed for single-use application.
4. Do they work on fabric?
Only heat-transfer decorative designs work on fabric, as regular transfers do not adhere well to textiles.
5. What surfaces work best for decorative transfers?
Wood, glass, ceramic, and metal surfaces provide the best adhesion for decorative transfers.